Category: Resources

Helpful files and links to online resources

  • cog removal research

    cog removal research


    spoking a cogged up hub, originally uploaded by BikeTinker.

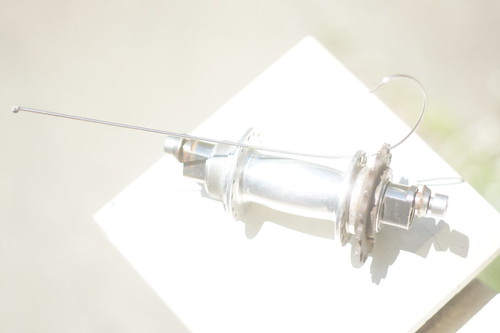
    My unbuilt White ENO hub with the evil 16t cog and the lockring is back on my table. I looked up how to remove a cog from a hub that isn’t built into a wheel, and found a good thread on possible fixes.

    Suggestions include:

    • Build half the wheel using the side of the hub where the spoke holes aren’t blocked by the cog.” One guy ripped his Shimano hub in half this way. I think the White Industries hub shell has more torsional strength due to its fatness, but I may save it for a last resort.
    • “String some spokes in the hub, using the cog-side spoke holes. If it’s high flange, it should work, be a man.” On this hub with a 16 tooth cog, this method requires bending the spokes almost into a circle as you thread it in, in order to pass the cog. Each spoke would have to be unbent before lacing the wheel. My one test spoke makes this seem like a crappy plan. I do have 11 free spokes and a couple rims, but I’m not excited to pursue this strategy.
    • “Make a wooden jig to hold the hubshell in a vice.” I have no vice. 
    • “Slit the cog with a Dremel cutoff wheel. Buy lots of wheels.” I have a Dremel I’d love to put to use, but I’m afraid. Plan C or D maybe.
    • “Strap tool. Strap tools are bad ass.” This seems like a good plan. I may need to buy one anyway. Because it’s a tool. This is Plan B.
    • “Go to the bike shop.” This worked for one guy. I love the Bike Peddler, and it’s three blocks from my house. Plan A.

    Other things I’m looking at in my workroom (toolboxes stacked on the floor of the shed):

    Brake cables… could these be used instead of spokes? Thread them through the holes, wrap them around the hub shell, and affix them to a rim somehow? Run the cable through the spoke holes, and affix them by the pinch bolts to dozens of brakes and derailleurs?

    The Bontrager. Put the hub in the dropouts, wrap the chain rotafix-style around the cog, get some leverage on the hub with… another cog on the freewheel side of the hub, and rotafixed with a second chain? My mental picture of this working out has twice as many stuck cogs, and a wheelless hub permanently jammed into frame, tied on with two kinked chains…

    Off to the bike shop! Maybe they’ll have a Phil cog-based lockring tool…

  • Fixing the bar-end shifters

    Fixing the bar-end shifters

    The other day I mentioned that I was having trouble getting the full range of gear engagement out of my Shimano 7 speed bar-end shifters. The helpful folk on the RBW List pointed me to a fix for it, right there in the archives. I had ignored the thread way back in September, since gears aren’t my bag, right?

    Since I now have two bikes with bar-end shifters, constituting 50% of my entire stable and all of my geared bikes, it behooves me to pay attention sometimes.

    I found this screwdriver on a bike ride.

    The basic problem is that if you take the shifter apart and fiddle with it, or buy it in separate pieces, or install it multiple times, you can end up with a shifter that doesn’t have enough “throw” to carry the rear derailleur all the way up and down the cassette. This apparently happens because the wound-up ratcheting springy magical thing inside the shifter gets unwound. To fix it, you need to wind it back up.

    In an ideal world, I’d be able to buy (or make!) a special tool to wind up the slack, and reset the shifter. In practice, you can simply use the shifter pod itself to wind the shifter back up.

    • You need to slack up the cable (but not remove it, yay).
    • Remove the shifter from the pod, leaving the pod in the bar-end.
    • Line up the square “chunk” on the shifter with the matching indent of the pod, with the lever pointed straight out.
    • Ratchet the lever straight down.
    • Take the lever off the pod, line up the squares with the lever pointed straight back.
    • Ratchet the lever straight down.
    • Times 4, or until the lever no longer goes down.
    • Take the lever off the pod, and line up the squares with the lever pointed straight down.

    You are now ready to rock and roll. “Rock and roll” is biketinker for “adjust the limit screws on the derailleur so you don’t shift into the spokes.”

    Every time you ratchet down, you’re taking slack out of the system. Or appeasing the tiny daemons that live in there.

    Here I am, practicing my new videography skillzes.

  • I can’t be the only person to recycle cable ends

    I squeeze them transversely (if the hole was a rice grain, I’d grab it by the ends and gently squeeze until it turned into a lentil), to open up the tube, then I clean up the opening with a scratch awl or corkscrew end. Or a nail. Pretty much the closest thing that might work. There’s a kind of fit curve between “can I see it from here,” and “I’ll know it when I see it.”

    If the cable goes into the cap, I’ll crimp it down with the needlenose pliers. Bike shops have a special tool for it, I think, that puts a nice crease in the cap instead of mashing it willy-nilly and hoping for the best.

    ferrule-recycle grooming-time

  • 47mm Marathon Supremes on a Quickbeam

    47mm Marathon Supreme measures 43mm

    Here’s a 47mm Schwalbe Marathon Supreme measuring 43mm actual width on a wide-ish rim.

    Yes, those are my calipers.

    I like the Marathon Supreme on the front. Cushy, and fast. I put in my best commute time after installing it. Not scientific, but it’s a nice-feeling tire.

    quickbeam-fork-clearance-marathon quickbeam-stay-clearance-marathon quickbeam-chainstay-marathon

    I took the Marathon Supreme off the back, due to clearance issues, but I may try again with a 19mm rim. The Kwest I have on there now looks anemic next to the giant Supreme on the front. I also plan to go back to the S3X, in order to ride some climbing loops at lunchtime.

  • 47mm Schwalbe Marathon Quickbeam clearance

    marathon quickbeam clearance, originally uploaded by BikeTinker.

    Some cropping might be in order for this picture… the picture part is in the bottom fifth.

    This is the maximum size I’m willing to run on a Quickbeam – “47mm” (41) Marathon. It works in all three gears (44t ring, 15, 17, 21 cogs), but only if nothing goes wrong. There’s plenty of clearance at the brake bridge and the fork. By “plenty,” I mean “more than here, but I wouldn’t want to run anything bigger.”

    I’m about to roll the setup back to Darktime Commuter, with fenders, dynohub, basket and narrower tires. *sigh* I really think the naked Quickbeam is Bad Ass.

    Fenders keep the chain much much much cleaner. That’s putting it mildly. Fenders keep the chain clean; no fenders filth it up right away if you ride on dirt.

    marathon quickbeam clearance, originally uploaded by BikeTinker.

  • “Share the Road” PSA from BikeTinker

    Rules of the Road:

    1. Expect to share the road with bicycles.
    2. Expect to share the road with cars.
    3. Move predictably.
    4. Never attempt to kill or injure another person intentionally.
    5. Pay attention, so you don’t kill or injure anyone unintentionally.
    6. Stay aware of other peoples’ presence, speed and direction.
    7. Alert people to your presence, but do not startle them.

    That’s it.

    An article in the Press Democrat about a new Santa Rosa ordinance to protect cyclists. The attorney pictured has some really nice bikes.


  • Tire Pressure App a’comin’

    Tire Pressure App a’comin’

    **UPDATE: The Tire Pressure App is for sale on Amazon!

    Some of your friends (Allan, Scott and I) have gotten together to make an Android app that will let you determine the optimum tire pressure for each bike in your garage. Fixing a friend’s flat on the road? A simple, “hey, Baby, how much do you weigh?”* and you’re off, punching in numbers on your phone like a real hero. And, ‘Hey, Presto!’* the optimum tire pressure for the bike.

    A presta valve as the needle for a pressure gauge, with PSI and BAR readings

    Anyway, that’s the icon I did for it, and I’m working on bike drawings tonight. If I told you how busy I’ve been for the last month, you’d be like, “So? You could still post. How hard could it be?”

    This is the idea I started with. I could’ve saved myself a lot of time, I think…

    presta valve PSI icon

    *That’s a joke. Just guess at her weight and say you’re texting a friend.
    ** That would be a good name for the app! Or else that’s the two Torpedos talking…

  • Podcast Interviews with Bike People

    I just heard about this archive of interviews with bike industry folk (thanks!) that Tandemgeeks has archived. Dian Lees of the Outspoken Cyclist interviews all the brightest stars of the cycling-nerd galaxy. I’m looking forward to listening to them, and I thought I’d pass them along. They’re all from 2011 and late 2010, and the list includes some people I really respect.

    Cycling Interviews on Tandemgeek v. 1

    • Don Walker, Builder & Founder of NAHBS
    • Craig Calfee, Calfee Design & Bamboosero
    • Dr. Gabe Mirkin, Nutrition & Fitness
    • Gary Fisher, On Gary Fisher
    • Diane Lees, “The” Outspoken Cyclist: The Outspoken Cyclist takes an opportunity to get better acquainted with our host, Diane Lees. Diane has been interviewing personalities from all corners of the cycling universe for some time now. Diane isn’t your typical artist or writer; and although she’s a bicycle dealer, Hubbub Custom Bicycles isn’t your average bike shop.
    • Richard Schwinn, Waterford/Gunnar
    • Steven Bilenky, Bilenky Cycle Works
    • Jacquie Phelan, MTB Legend
    • Ben Serotta, Serotta Cycles

    Tandemgeek’s Interviews with Cycling Luminaries v.2

    • Rob Vandermark, Seven Cycles
    • Keith Bontrager, Bontrager
    • Richard Sachs, Richard Sachs Cycles
    • Brent Steelman, Steelman Cycles
    • Paul Price, Paul Components
    • David & Brenda Vandevelde, MBS Tandems
    • Maynard Herson
    • Mark Livingood, TheTandemLink.com
    • Joe Breeze, Breezer Bikes

    Visit Tandemgeek to listen to the podcast interviews.

  • World’s Cheapest Multi-Tool

    World’s Cheapest Multi-Tool

    Also the world’s lightest.

    world's lightest and cheapest multi-tool

    I’m going to make up one of these for each of my bikes, tailored to the bolts on that bike. I’ve already got a patch kit, blinkie and asthma inhaler on each bike, I just need to get a packet of handy-wipes and a small wrench. I guess technically, the wrench should be part of the “tool”…

    Does anyone have a better little kit? I used to have one that fit in a patch kit, with the ends of the wrenches sticking out a hole I cut.

  • How do you wire up a bottle dynamo?

    How do you wire up a bottle dynamo?

    I have a SON hub on my Quickbeam, driving an E6. I’ll get LED lights, but I have like 4 dynamo halogen lights, and 6 or 7 spare bulbs. My short term goal is to get more than one of them into use on more than one bike. I just built a very affordable Alfine dynamo hub, but realized the 19mm rim might not be the best match for the 53mm Big Apples on the gravel roadster. Probably wise, since today the rear SpeedDisc rim decided it was too small to keep the Big Apple seated. I don’t know if the bead broke, or what, but that tire will not go back on that rim… Anyway, I put the new wheel on the Ross, with an E6 I got from a friend. Works great, but I’ll probably have to trim the lens tabs to work right.

    So… the new plan is to set up the gravel roadster with a bottle dynamo I got from another friend.

    Except I have no idea how to work those things. Surprisingly little internet resources are devoted to the question of how to wire a bottle dynamo to an E6, and half of those use clever black bottle dynamos with two explicit wire mounts. This one has a little capped-off recess that probably takes one wire. I found a picture that looked like the ‘extra’ lead is grounded to the mounting bolt, so I decided to run with it.

    I put a wheel with an inflated tire into a truing stand in order to test my dynamo, and started cutting off perfectly good spade connectors and stripping wires to get some bare leads. I connected the wires to various parts of the dynamo, and held the wheel against the tire. What seems to work is obvious in hindsight. One lead goes through the little plastic cap – through a hole, doubled back through another hole, and screwed into the bottom of the bottle, and the other lead goes to the connection bracket. Hold it all together and put the dynamo head against a spinning tire, and the light shines! Pretty magical.

    I bought some shrink-tube and a little box of circular wire-ends, but didn’t install them. I went for a bike-ride instead. Two, actually.


  • LED replacement light genius

    LED replacement light genius

    This is such a good idea. I’m impressed.

    On his blog, Jan announced the availability of new red LED lights you can screw right into a vintage taillight. Old-style screw mount, new-style LED light, with no rewiring. Wow.

    LED light, vintage mount paintingRather than remove the vintage taillight internals and carefully repack the light with modern LED taillight electronics, you simply screw in the new bulb and ride away. It even includes a standlight function, build into the screw mount.

    Buy one from Compass Cycles – they’re $20.

  • Bike-fit geometry relationships

    Bike-fit geometry relationships

    jimmythefly bike geometryMy flickr friend Jimmythefly drew a set of bikes to show how, if you keep the saddle to bottom bracket (BB) relationship the same, seat tube angles can make bikes with the same dimensions (top tube and seat tube lengths) can fit very differently.

    Because of the interrelationship of frame angles influencing tube lengths, two bikes in different “sizes” (seat and top tube lengths) can fit exactly the same.

    It’s non-intuitive. It’s weird. It needs a picture to really see how it works. For me, I needed to see the drawings overlayed, which is why I made this GIF. Thanks, Jimmy, for the clear illustration and explanation.

  • one of these bottle designs is a good idea…

    one of these bottle designs is a good idea…

    old-timey oil can far superior to tall tippy bottles
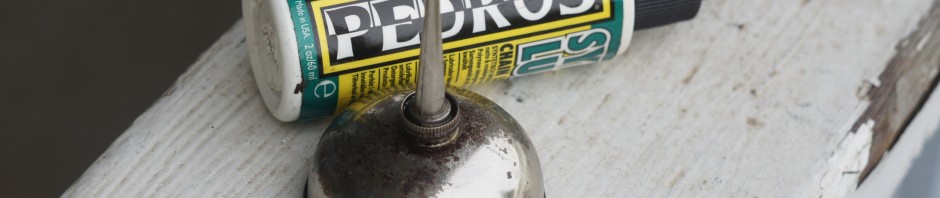
My tall bottles of bike oil (TriFlow, Pedro’s, ProLink, whatever) can usually be found tipped over in a pool of expensive oil.

    This little oilcan I got at a thrift store has never tipped over. It looks like they run about $10 each on eBay, which is a pretty good deal if you count all the $5 bottles of oil I’ve wasted!

    This one I fill up with synthetic motor oil – whatever’s left in the cans after an oil change.

    If I were an industrial designer… I would package my oils in short, squat little bottles shaped more like these old oilers. They were designed like that for a reason.

  • Easier nipple-driver hack

    Easier nipple-driver hack

    I went to make this again for an Instructable, and realized there’s an easier way, if you have cloth handlebar tape. I wanted a smaller screwdriver, and chose this little wooden-handled gem I found on a bike ride. The tip was a little mangled, so I cleaned it up with a file. I didn’t take pictures of that part – I just did it.

    Basically, you wrap the screwdriver with about 30mm of handlebar tape, depending on the thickness of the shaft, and slip the aluminum tube over it. Friction, rather than adhesive, keeps the tube situated.

    Everything you need to make your nipple driver: screwdriver, bar tape, aluminum tube and scissors.

    spokedriver materials - screwdriver, bar tape, aluminum tube and scissors

    Snip the tape at an angle. It makes it easier to slide the tube over.

    snip the tape at an angle - ~30mm worth

    I snipped my first one square, and angled it later.

    wrap the tape tightly around the screwdriver shaft
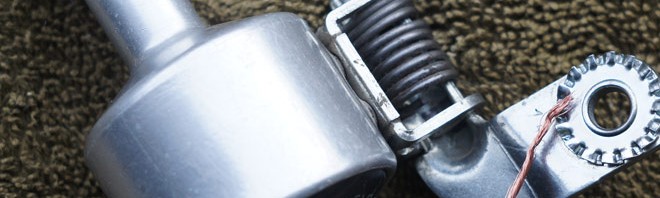
Slide the tube onto the wrapped shaft (is it just me, or is it getting warm in here?).

    Tube slipped over tape-wrapped shaft. Ready for use. And there you go – ready to hold your spoke nipple steady as you insert it into a deep-section rim to mate up to a spoke.

    huh. I grew up to have my dad's hands.

    You can easily remove the tube and tape and throw them in a drawer until you need them again. If you build wheels regularly, you might keep one permanently modified.


  • Spoke nipple tool for deep well rims

    Spoke nipple tool for deep well rims

    I just built a wheel with moderately deep section (the IRO “Cold Fusion”), and had a heck of a time starting the nipples without dropping them inside the rim. I hope my missing nipple didn’t end up inside the rim*…

    spoke-nipple starting screwdriver modification

    The last time I used these rims I didn’t have that problem but no matter. I devised a simple tool that helped immensely – a screwdriver (slightly magnetic) with an aluminum tube around the end to hold the spoke nipple. aluminum tube on screwdriver end

    I had some thin-gauge aluminum tubing left over from making a spacer to mount my dynamo light on my Nitto M12 rack. In fact, I used the exact 3″ tube I’d used as a spacer until it deformed too much.

    tape a tube to the screwdriver

    *My wife and 11 year old son both think the term “spoke nipple” is hilarious.