Category: Projects

  • Basket-mounted light bracket

    Basket-mounted light bracket

    Attach a light mount to a basket with fender washers.

    If your front basket blocks your fork-crown mounted dynamo light (and how could it not?) you might be able to mount the mount directly to the basket. Two fender washers to sandwich an intersection of the basket wires, an M6 bolt and a cap nut.

    Might work

  • ** RECOVERED BIKE **

    ** RECOVERED BIKE **

    This March, my friend’s bike was stolen out of my back yard. That sucked. I had fixed it up from its moving-beating (the movers bent some stuff that shouldn’t oughta get bent), and I put on some new bars, and replaced the shifters, and before I’d even cut the (brand new, full pop retail)* cables to length, someone stole the fucking thing out of my yard! My yard. Solid black dog, giant Swiss dog, three mean-ass cats, and they still walked away with it. I guess the advantage of stealing transportation is that it aids its own theft.

    Anyway, shame and irritation long gone, Swiss dog replaced with a newer model (Requiescat in Pace, Nadia; welcome, Rosie), seasons have changed, and the other night we took a nighttime trip to the CVS to get some drugs for a possible UTI**, not a fun outing. Walking into the store, I check out the bike that’s abandoned*** out front. “That’s a well-sorted hobo bike… THAT I TOTALLY RECOGNIZE. No WAY.” I took it by the horns and rolled it over to the car. Women were exiting the store, chatting about Michelangelo, and to them I must have looked like someone putting my own bicycle into my own car, because that was how I felt. Snip, snap, into the boot, slam the trunk, and I went shopping.

    I kind of cruised the store, with an eye out for someone who might have been a bicycle thief (or a duped grandmother with no other transportation), but didn’t spot any candidates. It wasn’t until we got home that I was like, “Hey, remember when Lisa’s bike was stolen out of our yard?” and Angelina’s like, “Oh my god, yeah, that was horrible,” and I got to say, “well, it was parked*** in front of the CVS, and now it’s TOTALLY IN OUR TRUNK!”

    trek-850

    The bike now needs another bout of attention, and the brand new Rivendell proto-Dove bars I got at their garage sale are scratched to hell, because the new owner adjusted the shifters three inches down the bar without using a screwdriver to loosen the clamps. Yeah, they weren’t the classiest shifters, but they worked, which was the whole point. I think I’m going to revert to the flat bars it used to have, and donate the cast aluminum 1985 Suntour (Shimano?) shifters from my first mountain bike. I’ve passed along nicer bits from that bike (WTB Greaseguard hub?), and its Salsa stem still lives on the Quickbeam.

    The nice fat slicks are gone, replaced with knobbies, which is what makes me want to set this up with the original flat bars, so Lisa can ride Annadel, 1990 style. Since, actually, there is no higher purpose to a bike than to ride in Annadel. Maybe she needs a basket for Belle, so she can bark at everyone they meet.

    * They’re STILL not cut! Just kind of wrapped back up out of the way. Jeez. I guess if you had any pride, you wouldn’t be a bike thief.
    ** I think the second conversation I ever had with my wife was about UTIs. Right after the “‘God;’ ‘Who do you want to be when you’re super-old;’ and ‘Do-you-want-kids?’ conversation.” Yes, we got married on our second date. Which is a funny story that I won’t burden you with now.
    *** Definitely abandoned. “Parked” makes me sound like the bad guy.
  • Le Garage Door Shot


    Le Garage Door Shot, originally uploaded by cycledefrance.


    “Damn you, cycledefrance!” Every single shot is amazing.

    If you like beautiful photos of bikes in interesting places, there’s more where this one came from.

  • Vintage Cunningham MTB @ Monkey Wrench Cycles (Lincoln, NE)


    I had no idea this was in Lincoln Nebraska. I saw the picture, and thought, “that must be Bicycle Odyssey.” Because, you know, 10 years ago they had a Cunningham hanging in the corner.

  • Giant Tire Pressure app update

    Giant Tire Pressure app update

    I don’t think the 400th post is a “thing” in the blog world, but in any case, here it is.

    The Bike Snob mocked the Tire Pressure App on Tuesday, right after our big update.

    Go get the tire pressure app! It’s pretty cool, now. 

    The update is visual and usability. The underlying function is the same; it should just be easier to get at. Here I am putting all my bikes in order.

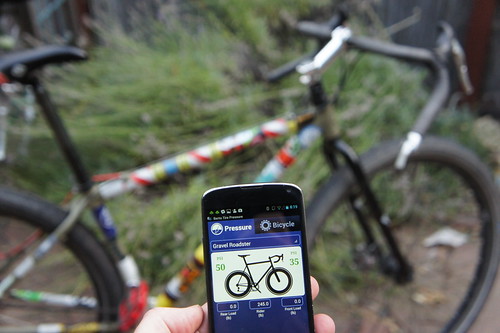
    This overlay shows the list of bikes. The free version lets you make two bikes, the paid version as many as you want (we know you have seven). In the future, this screen may show pressures, as a quick reference.

    If you Add a New Bike, it will clone your selected one. Most people have slight variations of the same bike, just like they do jackets, so it’s a convenience.

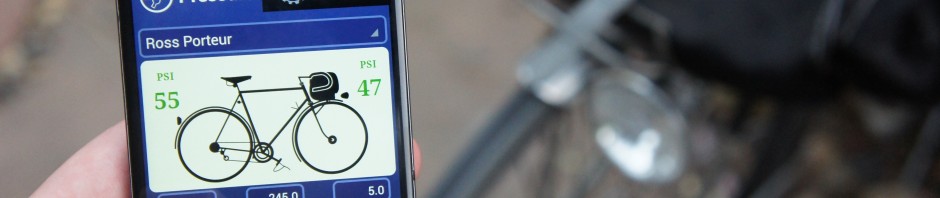
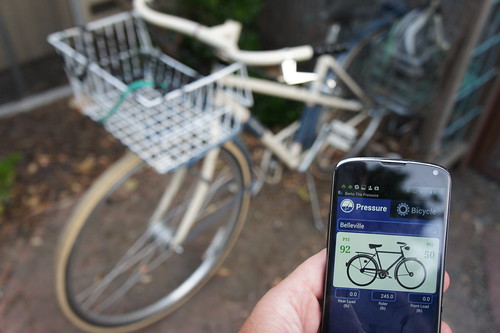
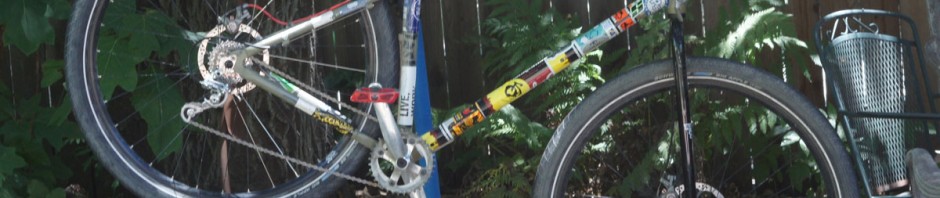
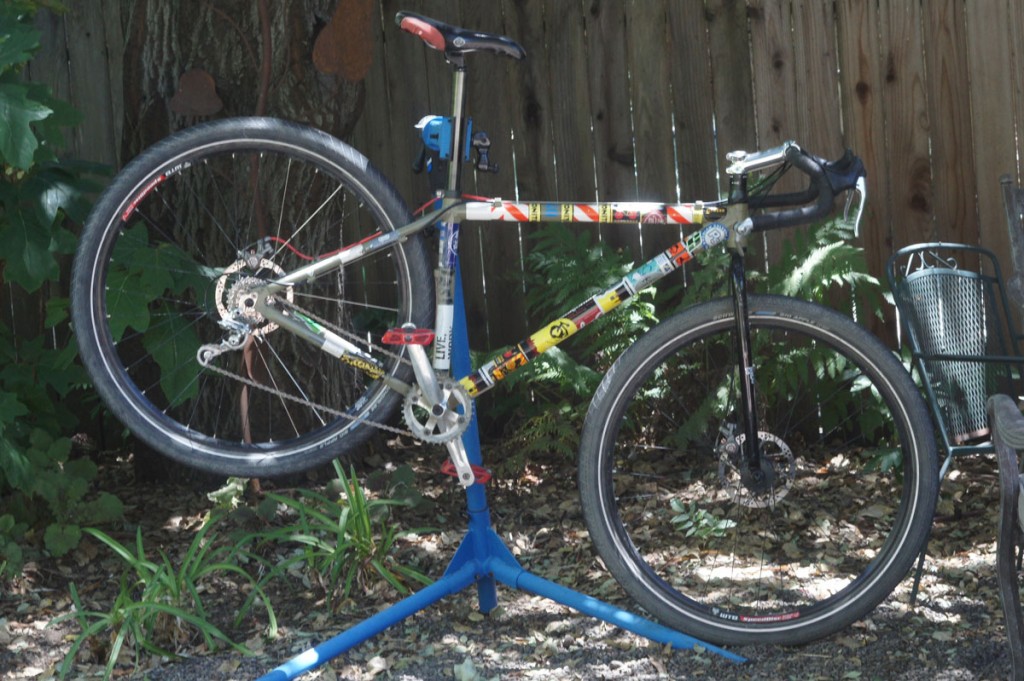
    This is the Quickbeam, showing pressure, with me weighing 245. That’s 40 lbs of pizza and beer. Mostly beer. Say, 32 lbs of Bridgeport and Sierra Nevada strapped to me at all times. Hence the superwide tires I like.

    To get the right pressure (15% tire “squish,” for low rolling resistance and comfort), you need to know the width (actual, by measuring) of your tires, the weight of the bike, and the weight of everything ON the bike (you, your bags, etc.). You can’t trust any damn thing the manufacturer puts on the side of the tire. You are allowed to lie about your weight, though, since it’s an inexact science.

    The inexactitude doesn’t stop there. Tire casing plays a role – if you have handmade tubulars, or the equivalent, you can add 10% more air. Do the math in your head, it’s good for you. If you have terrible heavy utility tires, you may not care what the pressure is, but you can probably run them lower.

    So you measure. I actually have a monkey wrench I use for this operation. The giant wrench fits over the tire, it’s adjusted snug, and then you measure the gap in the wrench’s jaws.

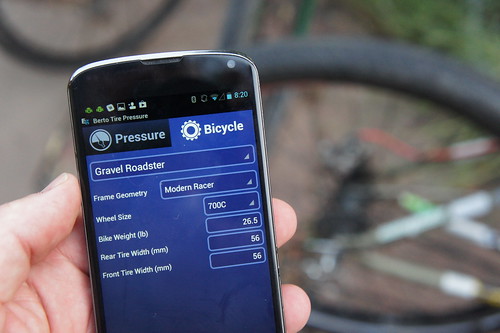
    In the app, you input the width, choose the style of bike (different bike geometries have different fore/aft weight distributions), and tell the app how wide your tires are. It does the math for you, with an equation that fits against measured tire drop.

    Pump it up and ride away. This app may shock you – if you weigh 220 lbs and are running 23mm tires, you are going to see that you’re over-weighting your tires, and pumping them up to 120 psi front and back is still way under inflating them. They’re rock hard, so you don’t have any of the advantages of riding on a pneumatic cushion, and you’re still deflecting them for more rolling resistance than you want. Lose-lose. You should have 153 lbs in the rear, and 98 in the front. So 120/120 is overinflating the front, underinflating the rear.

    I’m unlikely to over-inflate 60mm Big Apples.

    In other news, I set my Strava personal best on the Tin Bar Stage Gulch climb this week, riding the Gravel Roadster with 60mm Big Apples. The bike snob tells me there’s now a “Gravel Racer” category of bikes. My 12 year old ate sushi and really liked it (mostly he eats fries), and I’ve been walking my dogs twice a day instead of riding to work. I Strava that, too.

  • Whoo-hoo, the cog is off!

    Whoo-hoo, the cog is off!

    I rode down to the Bike Peddler on the Bontrager, with the stuck-cog ENO Eccentric hub in my handlebar pack. Truth to tell, I chose the Bontrager because I bought it from NorCal Bikesports back when it was called “Dave’s,” and I thought I might have a better chance with my weird request if they recognized a bike they’d sold. Ten years ago half the employees at both shops had owned one of these closeout Privateers.

    When it was my turn at the repair counter, I produced the hub, with the cog and lockring still attached, and said, “What I have is in the nature of a challenge. Is it possible to remove this cog? And… how much would it cost?”

    The mechanics laughed, and said, “you’re supposed to remove this before you cut out the spokes!” I told them I bought it, and they said, “I hope you didn’t pay too much.” I said, “It depends on how this goes.”

    Untitled, originally uploaded by BikeTinker.

    It went well. Two guys, four tools and a vice. As one of the attending mechanics said, “It’s easy if you have the right tools.” He looked at the setup in the vice, “Or in this case, the wrong tools, used appropriately.”

    taking a cog off an unlaced hubThe hub goes in the vice, the pin spanner* fits into two spoke-holes, and is held in place with vice-grips or locking pliers, so it can’t jump off the hub. Chainwhip goes on the cog, with a cheater bar for more leverage. The pin tool also has a cheater bar. Two strong men lean into it, and the cog spins off.

    The mechanic picks up the cog and wipes down the threads, “Who wants to call it? $10?” Well worth it. Ten minutes, and 100 years of experience, vs two hours and something broken, if I’d done it myself.

    b/w picture of a shiny ENO hub, with a lockring and cog

    *The pin spanner! This is the key element I didn’t see anyone online recommend. A cog-removing pin-spanner with several pins and a self-gripping feature would be a dynamite tool… Problem Solvers?


  • cog removal research

    cog removal research


    spoking a cogged up hub, originally uploaded by BikeTinker.

    My unbuilt White ENO hub with the evil 16t cog and the lockring is back on my table. I looked up how to remove a cog from a hub that isn’t built into a wheel, and found a good thread on possible fixes.

    Suggestions include:

    • Build half the wheel using the side of the hub where the spoke holes aren’t blocked by the cog.” One guy ripped his Shimano hub in half this way. I think the White Industries hub shell has more torsional strength due to its fatness, but I may save it for a last resort.
    • “String some spokes in the hub, using the cog-side spoke holes. If it’s high flange, it should work, be a man.” On this hub with a 16 tooth cog, this method requires bending the spokes almost into a circle as you thread it in, in order to pass the cog. Each spoke would have to be unbent before lacing the wheel. My one test spoke makes this seem like a crappy plan. I do have 11 free spokes and a couple rims, but I’m not excited to pursue this strategy.
    • “Make a wooden jig to hold the hubshell in a vice.” I have no vice. 
    • “Slit the cog with a Dremel cutoff wheel. Buy lots of wheels.” I have a Dremel I’d love to put to use, but I’m afraid. Plan C or D maybe.
    • “Strap tool. Strap tools are bad ass.” This seems like a good plan. I may need to buy one anyway. Because it’s a tool. This is Plan B.
    • “Go to the bike shop.” This worked for one guy. I love the Bike Peddler, and it’s three blocks from my house. Plan A.

    Other things I’m looking at in my workroom (toolboxes stacked on the floor of the shed):

    Brake cables… could these be used instead of spokes? Thread them through the holes, wrap them around the hub shell, and affix them to a rim somehow? Run the cable through the spoke holes, and affix them by the pinch bolts to dozens of brakes and derailleurs?

    The Bontrager. Put the hub in the dropouts, wrap the chain rotafix-style around the cog, get some leverage on the hub with… another cog on the freewheel side of the hub, and rotafixed with a second chain? My mental picture of this working out has twice as many stuck cogs, and a wheelless hub permanently jammed into frame, tied on with two kinked chains…

    Off to the bike shop! Maybe they’ll have a Phil cog-based lockring tool…

  • Fixing the bar-end shifters

    Fixing the bar-end shifters

    The other day I mentioned that I was having trouble getting the full range of gear engagement out of my Shimano 7 speed bar-end shifters. The helpful folk on the RBW List pointed me to a fix for it, right there in the archives. I had ignored the thread way back in September, since gears aren’t my bag, right?

    Since I now have two bikes with bar-end shifters, constituting 50% of my entire stable and all of my geared bikes, it behooves me to pay attention sometimes.

    I found this screwdriver on a bike ride.

    The basic problem is that if you take the shifter apart and fiddle with it, or buy it in separate pieces, or install it multiple times, you can end up with a shifter that doesn’t have enough “throw” to carry the rear derailleur all the way up and down the cassette. This apparently happens because the wound-up ratcheting springy magical thing inside the shifter gets unwound. To fix it, you need to wind it back up.

    In an ideal world, I’d be able to buy (or make!) a special tool to wind up the slack, and reset the shifter. In practice, you can simply use the shifter pod itself to wind the shifter back up.

    • You need to slack up the cable (but not remove it, yay).
    • Remove the shifter from the pod, leaving the pod in the bar-end.
    • Line up the square “chunk” on the shifter with the matching indent of the pod, with the lever pointed straight out.
    • Ratchet the lever straight down.
    • Take the lever off the pod, line up the squares with the lever pointed straight back.
    • Ratchet the lever straight down.
    • Times 4, or until the lever no longer goes down.
    • Take the lever off the pod, and line up the squares with the lever pointed straight down.

    You are now ready to rock and roll. “Rock and roll” is biketinker for “adjust the limit screws on the derailleur so you don’t shift into the spokes.”

    Every time you ratchet down, you’re taking slack out of the system. Or appeasing the tiny daemons that live in there.

    Here I am, practicing my new videography skillzes.

  • skate deck color check

    skate deck color check

    I had a skate deck color request for “not quite chartreuse, not quite olive-y acid green.” I thought all my decks were black (with a sexy black band around them), but I had a rasta deck hidden away as well.

    This seems more “not quite Juaritos limon soda,” but I really like the stickers.

    rasta-deck

    I think I can make matched pedals by using pieces that match diagonally. Usually a pair is directly attached, where the left side of the deck becomes the right pedal deck, and vice versa.  Just have to be a little more careful in the measuring…

    Update: Success – the diagonal matching works! This whole deck is getting that treatment. I’m prepping more decks even now. They’ll go on Etsy, with cleats, at a dramatically inflated price.

    recycled wooden platforms for clipless pedals skatedecks for clipless pedals

  • White ENO hub with a cog, lockring and no spokes

    White ENO hub with a cog, lockring and no spokes

    how will I get that cog off? Or build a wheel?

    This was an impulse buy. I should regret it, but I don’t. I’ve wanted an ENO hub for a long time, partly because it’s useful for fixing (“turning into fixies”) bikes with vertical dropouts, but mostly because it’s such a cool idea. I have a goal of putting White hubs on a couple of my bikes, but haven’t yet. I love hubs. I’m attracted to the shiny blingy ones, but I really like the ones that do weird things.

    This hub has a center of rotation that is non-congruent with the axle ends. This feature lets you run a singlespeed or fixed wheel on a bike with vertical dropouts, because you can swing the hub backwards to tighten the chain. Before the ENO Eccentric, you would have needed to calculate a Magic Gear, in order to have a decent chain tension with a vertical dropout. So it’s cool, and extremely niche. In fact, secret knowledge is the essence of cool.

    genius

    This one has 135mm rear spacing, so it could be built into a 26″ wheel for the Bontrager, or a 29er wheel for the Gravel Roadster. I like the Bontrager as it is, and I just geared up the Gravel Roadster with a derailleur and cassette.

    So I have a hub that’s begging for a new bike to be built around it. Oops. Maybe a Legolas or Black Mountain Cycles cyclocross bike? A Jones doesn’t need this, since it comes with an eccentric bottom bracket that does the same thing. Those are all unlikely choices, since I already spent my discretionary funds on this hub… oops.

    shiny silver ENO hub

    The other “oops” is that it was cut out of its wheel before the cog and lockring were removed. I figured I’d lace it to a rim, to get some leverage on the cog, but it’s going to be hard to weasel spokes past the cog and into the spoke holes in the first place.

    awful 1/8" cog tooth

    I won’t keep the cog on there. I don’t think I can build a wheel without removing the cog, and I don’t use 1/8″ cogs, anyway. Or lockrings (the Rotafix Method is fine). So… what’s the best method to remove a cog from a hub, if you can’t use the rim for leverage?


  • Four clicks on a 7 speed shifter

    Four clicks on a 7 speed shifter

    I bought a used 7 speed set of bar-end shifters in preparation for gearing up the Gravel Roadster. I also got a nice set of clamp-on downtube shifters for the Ross at the same time, but realized that I don’t have a cassette-able wheel that will work with the 120mm spacing it has now, after 13 years as a fixed gear. The Kogswell singlespeed hub I’ve got on there is only suitable for fixed use (and offroad fixed, at that), because the nut (or something) makes it unpossible to remove a freewheel with our normal Earth tools.

    I digress, but the gist is, “hey I might have zero single-geared bikes by the end of the summer.” Unlikely, but possible. I might do it just to freak myself out. I have an automatic Sachs two speed coaster brake wheel and a Sturmey-Archer S3X three speed fixed I can put on the Quickbeam in about four minutes (that’s half an hour in biketinker time).

    Back to the matter at hand. I did indeed install the cassette and (just the right) shifter on the Gravel Roadster, and I rode it 10 miles with some friends from work, on their normal road loop (Lakeville, Stage Gulch, Adobe Rd). If we were to judge on tire size, I was the clear winner, with 54mm Big Apples, to their 25mm whatevers (volume increases by the cube, too, so… yeah). If we were to judge on usable gears, though, I was by far the loser. I had two chainrings, but no front mech (that’s English for “derailleur,” which is French for “derailer“), they were only 4 teeth apart, and of the nine cogs in back, I had maybe 5, since I could only get 4 clicks out of the indexing. The smallest cog (biggest gear), and the top three (easiest) cogs were unreachable with the shifter. My hardest available gear was about perfect for the ride leader’s pace, which was steady, just shy of brisk. The cassette is by no means a tourist’s friend, or a mountain bike cluster. It might even be a straight-block (it’s not). The limited range cog set is the funniest thing about the bike, even counting the Cyclone derailleur and the pink fenders. It is a roadster, though, not a jeep.

    So I was rolling along Lakeville, getting parched on Stage Gulch and spinning out on Adobe Road, with cogs ranging from 13 to 18 teeth on a 32 tooth ring. About 72″ to 54″ of development, WHICH IS THE SAME RANGE I HAVE ON MY FIXED BIKES.

    I had a good time, and my only embarrassment was failing to call out a black foam-wrapped 2×4 laying across the bike lane. “It looked like asphalt! I never ride with people! Ride fatter tires! Geez… ”

    But. For all the fun, and the adequacy of the gear, it wasn’t working like it ought, which irks my OCD, and I don’t see the point of having shifters if they don’t give you more range than you can get with a dingle setup.

    Why didn’t the Shimano 7 speed shifters give me a full derailleur’s swing of travel? My full friction Suntours on the Bontrager give me all 9 cogs. My friends on the RBW (Rivendell) list told me how to fix it (and more interestingly, why it was broken), which is a post for another day.

    (I’m learning a bit from Paul McGowan, not just about musical reproduction, but about blog posting. Set the stage., String the punters along, and give ’em their money’s worth…) ;^)

    gravel-roadster-gears


  • Spoke replacement with a disc wheel

    I rigged up the Gravel Roadster with a 9-speed cluster, a Suntour Cyclone derailleur, and a 7-speed bar-end shifter. So gears. I put gears on the old Big Apple one-speed.

    gravel-roadster-gears

    I’m setting it up for my brother, who’s moving out here in August, after 20 years in the Navy. He ought to have a bike to ride, and I’m doing the shakedown cruise by riding it with roadies on the lunchtime ride at work.

    One of them noticed my rear wheel was out of true, and when I went to fix it (after not finding my truing stand anywhere), I saw that a spoke was broken. There are a few silver spokes mixed in with the black already, so the wheel probably took some damage at one point, and other spokes may fail.

    broken-spoke-disc-wheel


    The downside of the disc brake, is that you can’t really get a new spoke in there without pulling the rotor. I poked at it, then just pulled out the DeWalt and the Torx bit and started dismantling.

    disc-whee-2lThe new spoke went in easily, and I thumbed it down to into the hub flange to angle it correctly, and peeled up the rim tape to drop in the new nipple.

    new-spoke-disc-wheel

    A few turns with the spoke wrench (and a little slipping and rounding – what’s up with that?), and the wheel is now acceptably true. I failed to mount the tire in the “correct” direction again, though.

  • quite the touring rig


    DSC02347, originally uploaded by socalpedalpusher.


    Check the hitch connection on that homebrew bike trailer. It seems like it deserves more study. I think there’s a fork or two in there, creating a universal joint…

  • 47mm Marathon Supremes on a Quickbeam

    47mm Marathon Supreme measures 43mm

    Here’s a 47mm Schwalbe Marathon Supreme measuring 43mm actual width on a wide-ish rim.

    Yes, those are my calipers.

    I like the Marathon Supreme on the front. Cushy, and fast. I put in my best commute time after installing it. Not scientific, but it’s a nice-feeling tire.

    quickbeam-fork-clearance-marathon quickbeam-stay-clearance-marathon quickbeam-chainstay-marathon

    I took the Marathon Supreme off the back, due to clearance issues, but I may try again with a 19mm rim. The Kwest I have on there now looks anemic next to the giant Supreme on the front. I also plan to go back to the S3X, in order to ride some climbing loops at lunchtime.

  • STOLEN BIKE – Valiensi


    MR3C9442, originally uploaded by JamesPatrickValiensi.


    One of James Valiensi’s bikes was stolen today at CSU Northridge. Yes, that’s his name on the down tube.
    If you see it on Craigslist or around Northridge, please email him (through Flickr?), or let me know and I’ll pass the lead on to him.

    Yellow JP Valiensi bike.
    Hammered metal fenders
    Wald Giant Basket on the front rack.
    Unique Bosco Bars with cork grips
    A bell.
    Leather Brooks saddle.
    Tweed seat bag.

    Dang, what a loss.

  • Three Nitto friends


    Three Nitto friends, originally uploaded by olipop.


    Olipop’s overlay of three Nitto stems, showing reach and rise. Also, it just looks cool.