Blog
-
recycled bar tape
The best part is that the roll on the left, which is from an under-layer across the tops of the bars, is composed of about nine separate short ends of black, yellow and green tape. All the black tape is just short pieces pressed together end-to-end.
It looks like someone working in a bike shop kept the trimmings from several bikes and reused them as padding. I may take them to the Cozine Community Cycle, where they can be used the same way, 15 years later! -
Busted pedal

Angelina broke one of her pedals completely off on the way to Winco for groceries. Dang.
She had to push the bike to the store, and then push it home, loaded with groceries. She detoured to stop at Joanne’s to buy supplies for her “Stitch and Boots” Etsy shop – she’s making shoulder/shopping bags that exactly fit in the smaller Wald bike shopping basket.
Her saga reminded me of a story my Anthropology teacher told of an Inuit fishing trip. An ethnologist (a sociologist for non-European non-upper non-middleclass people) set out on a fishing trip with some Eskimos. About a day out, the outboard motor broke, and they paddled over to an ice floe and set up camp. One of the Eskimos found a piece of broken metal, and the leader guy started shaping it to replace the broken gear. After two days, it was ready. They fit the part in, and tried the engine. Failed. The ethnologist is getting really antsy now – they’re running out of food, three days into their three-day fishing trip, and he’s been on a 1/2 acre ice floe for two days watching a guy file metal.
They spent another day on the ice, filing that gear into the right shape. Finally, after a full day of file-file, fit the part, fail to start the engine, they ate the last of their food, filed a little bit more, put the new gear into the engine, and… fired it up! Thank God!
“Finally! We can go home!”The Inuit looked at him. “Fuck that. We came to fish.”
-
Gear Ratios for 700 X 32 / 32-622 tire with 170 mm cranks
32 25.0 % 40 10.0 % 44 15 57.6 72.0 79.2 13.3 % 17 50.8 63.5 69.9 23.5 % 21 41.1 51.4 56.6 10.5 % 19 45.5 56.8 62.5 35.7 % 14 61.7 77.1 84.9 QB = 32/40 chainrings
Ross = 40/44 rings
15t fixed cog wheel
17/21 double-fixed cog
19t cog on 2-speed hub – The 14 in the chart is the equivalent high gear from the auto-hub.
I want to build my new Torpedo Automatic hub into a wheel I can use on my Ross (frenchified touring bike), and my Quickbeam (british-style rough-stuff bike). I realized that replacement cogs are a lot cheaper than replacement chainrings, and easier to install. The same three-spline cogs work on Sturmey-Archer, Sachs (F&S), and Shimano internal gear hubs, and seem readily available: $8 some places, $15 from Harris, who has a comprehensive selection of sizes (14 to 23 teeth in both chain widths).A 36 tooth ring would work perfectly with the 19 tooth sprocket the hub came with. Luckily it’s 3/32″ width, as well, rather than the 1/8″ bullshit BMX/track width. However, the chainring setup I have is perfect for each bike, and getting a 36 tooth chainring would almost necessitate a new bike. Or building the hub into a 26″ wheel, which just isn’t going to happen.
Since the rings on both bikes work great with the 3 fixed wheelsets I already have, one of which I JUST built up… the Torpedo cog was up for re-consideration.
My existing wheelsets have 15t cogs and Surly “dingle” cogs (really unfortunate name – I say ‘dingle,’ you say… ‘berry’). The double-fixed cogs work great on the Quickbeam for road and steep singletrack with the 32 and 40 tooth rings, and also on the Ross, with 40 and 44 tooth “Rocket Rings” from Harris Cyclery. You can see from the chart above the gear inches I can use.After a lot of cogitation, mathematics, and plugging numbers into Sheldon Brown’s gear calculator, I decided that the best cog for the Torpedo Automatic… was the one it came with! A 19 tooth 3/32″ dished cog.
I think that will give me the most fun and versatility with each bike. The ‘road gear’ on the Quickbeam is crazy-low at 62 inches, but it also usually has larger tires (35 to 42 mm), which knocks it up an inch or two. On the Ross, the high gear is 77 inches, and the low gear is 57″, both higher than I prefer, but very usable.
There’s no way I would be doing this right now and considering it fun, if it weren’t for Sheldon Brown. Viva Sheldon! -
Moonlight Ride
“Cycling, like sex, is often a solo affair.”-Pablo NarudaThere’s nothing I love so much as riding alone under a full moon. Tonight I rode the Ross fixed gear out Baker Creek, listening to the babbling of the creek and the rattling of my battery light.
The light didn’t do much illuminating. The moon was much brighter.When I got fairly far out there, I was surprised that I could spin the rear tire, seated, on a flat road. The road was sparkly with tiny ice crystals, and a little farther up everything was frosty, like it had snowed. When I turned around, I got a little creeped out by the idea of a mountain lion drawing a bead on me. Big stinky prey.
I was pretty careful coming back down the hill, and through the frostiest low section next to the creek. The careful pace became a habit, until I realized I was never going to make it home at that speed, and my thumbs were starting to smart from the cold again. I stopped and listened to an owl hooting for love, then hauled ass home.
Coming by Grenfell Park, I noticed a funny crackly feeling in my beard, and put my hand up to my face. Ice! Ice in my beard! Crazy.I saw three cars the whole time, and two of them when I was almost back to ‘civilization,’ so they almost didn’t count. In the last mile home I felt a couple of raindrops and hurried on even faster, still being careful to take the corners kind of wide and upright. Apparently I’m still afraid of these 25mm tires!
-
Custom high-rise stems
My riding yesterday up in the woods showed me just how poor my fitness and bike handling skills have become. Rather than inspire me to ride more, it made me want a custom stem to put the midge drop bars a little higher and closer! Specifically, a 52 x 180 stem like the one illustrated below.BikeCAD drawing courtesy M. WhitmoreAnyway, instead of riding this morning, I researched custom stems.
Vanilla, Sycip, et al. seem to only make stems for their custom frame orders. MAP cycles (one of my favorite Portland builders) will do a custom $325 stem. Ahearne will do a fillet brazed stem starting at $275.It looks like the bargainz are the $135 stem ($165 with removable face plate) from Rex Cycles, a possible $175 Rock Lobster (a good match for a Bontrager, I think), and Willits’, $150 Scorcher stem. Wes Williams has made hundreds of super-high-rise stems for exactly this purpose.
-
New three-speed fixed gear hub
First – I hope people realize that this blog is mostly to write down my ideas so I don’t have to think them up again later, right?
Secondly, it might be useful to someone else who’s thinking along the same lines. Those people are pretty few, but you know who you are.In that vein, here are my thoughts on the new Sturmey-Archer S3X, an internally-geared three-speed fixed-gear hub. More info, including a schematic, and the proposed colors can be seen on the Sturmey-Archer SunRace blog.
What is it?
A hub-gear that lets you change gears without deraillers, like the old Raleigh 3-speeds. What it doesn’t do is let you coast.Why would you want that?
Because it’s COOL. I don’t like to coast. I like fixed gear bikes. I like the feel of the drivetrain, I like the challenge of the uphills and the down. I like them.
But if the challenge is so fun, then why a multi-speed fixed gear? Because I have one now, but I have to monkey with the wheel to change gears. I like to ride my bike, and the places I’ve lived have always had hills. Sometimes mountains right in the middle of your ride, and dirt trails are harder to climb than paved roads.What is that S3X EXACTLY?
It’s a three-speed fixed hub that has a wide gear ratio of Direct Drive (the most efficient, 1:1 gear), 2nd gear at -25% of 1st, and 3rd at -37% of first.This gear spread is like the old Sturmey-Archer 3-speed AW hubs most people are familiar with. The gears are not like the uber-rare Sturmey-Archer ASC 3-speed fixed gear hub it most resembles otherwise. In 10 years, I’ve known maybe five people on the internet who say they’ve owned one. The AW was one of the longest-lived bike parts ever, possibly one of the longest-lived mechanical items of any kind. The ASC was kind of cultish from the start, and was made for British time trialists (race against the clock on public roads). The ASC had a narrow gear range for optimum efficiency over roads that weren’t that steep, ridden by real hard riders. The AW was made for a wider range of landscape, load and rider.
The people I’ve heard complain on the internet about the “useless” wide gear range of the AW and the new S3X have never backed up their assertions (to my knowledge) with any data about their own multi-speed fixed gear riding.
I think this hub is awesome, and I’m actually going to save up, and possibly sell something to afford one at the $140-$160 pricepoint it’s rumored to have. To see how it meets my needs, I’ll sum them up.
Here’s my multi-speed fixed-gear riding experience:
I’ve had a Rivendell Quickbeam for almost 5 years, and run 42″ to 74″ gears on it. The QB has 40t and 32t chainrings, a 15t and a 17/21 Dingle cog. I also have a Ross touring bike with 40/44 tooth rings and the same Dingle cog for a 70″ and 51″ gear combo.I’ve pushed my 70″ gear over Sonoma Mountain, and taken it 50 miles through Occidental. I should’ve dropped down to the 32 for Sonoma Mountain, but I wanted to see if I could do it in the big gear. I’ve ridden out to Sweetwater Springs Road in the 72″ gear, dropped down to the 57.6″ gear and rode over it. Multispeed fixed gear is my favorite thing. I also like brakes.
I’ve ridden the 57″ gear up Mt. Tam’s and Mt. Diablo. 57″ is too high to climb Diablo comfortably for me. I’ve offroaded the bejeezus out of the 41″ gear (Surly Dingle cog, another awesomely great invention). Intellectually, the 41″ gear is way way too low, but in practice it’s really really good.
For general riding I like a 70″ gear, but I’ve gone as low as 64″ and as high as 74″ for periods of time.Given that background, and this upcoming hub, I’m interested in being able to run a a 70″, 52.5″, and 44″ gear, or 84-63-53 to put the normal gear in the middle and have a bigger top end. A stronger rider or a road-only rider may prefer this to the 70″ direct drive, but I’ve been really liking that 42″ climbing gear! Someone who only rides down hills might like a 94-70-60, too. That actually looks pretty good for long flat rides, but I’ve never lived places like that.
For the riding I do, I could be happy for a long time with the 70-52.5-44, or a 72-54-45. No fussing with the wheel at the bottom of the mountain to change gears, no fussing with the fender as the wheel moves back in the dropout to tighten the chain with the smaller chainring.
It looks like the Sturmey Archer S3X will have 12 and 13 tooth cogs, which seem smaller and more wear-prone than bigger ones, but they’d save some weight and minimize the chances of people ripping up the internals with a tiny ring and a big cog.
Real gear choices from the S3X:
My favored 70″ to 72″ top gear could nicely be gotten with any 30 to 34 tooth chainring, and a 40×13 looks pretty nice at 83-63-53. It would be a different set up than I’ve got, but the larger gear would last longer. I’ve got a couple 40t rings, 63″ isn’t so bad for noodling around town, and steep descents would be a lot easier. Maybe too easy.
A 36×12 would give you 81-61-51, and a 40×12 puts out 90-68-57.
44×12 would give you 99-72-62, for all that Southwest Louisiana road riding you do.
All calculations arrived at with Sheldon’s Gear Calculator of course, and rounded for simplicity.Fantasy gear choices using a Schlumpf:
Tom Shaddox (New Golden Age of Gear Bashing pt. 42) points out that an S3X running 36×15 with a 2009 Schlumpf Speed-drive would be a perfect set of six fixed gears: 113″, 85″, 71″, 65″, 49″ and 40″.See your own choices:
Here’s my Google Docs spreadsheet of the S3X’s gears. The Excel formulas I used look like this:
A3: desired top gear B3: =A3-(A3*0.25) C3: =A4-(A4*0.37)
-
GLOW in the dark OURYS!
Click the picture and read the comments.
sonofson: What, are you EIGHT?
Sorry. Earlier today my tolerance for my generation’s hard-on for the trappings of childhood hit its limit. Spawn dolls aren’t cool. Murakami isn’t cool. Glow in the dark grips ARE cool… until you’re 14.
-
helmets and cars
Ever have someone in a car ask you, “where’s your helmet?”
I did once, and she waited until the light changed to do it, too. Which means she was stewing about it for a couple minutes before she had the opportunity to ask a rhetorical question without any repercussions (except my patented “dumbfuck deadman” look that clearly conveys to anyone around that I think you are so stupid you should be dead).
For years after that, I waited for it to happen again, so I could shout, “IN MY PANTS!”
Of course when it did happen again, about two weeks later, on a beautiful green singletrack trail, I was once again too dumbstruck to do anything but stare.
Basically, this isn’t a “newsy” blog post, I just wanted to point out that someone in a CAR, asking me where my helmet is… that’s like a retard with a gun who thinks I should wear a bulletproof vest.
“I don’t have to be careful… I’ve got a gun!“ -
My asthma medication costs $300 a month.
Just for Advair and Singulair, not counting the emergency inhaler at $40 a pop. That made me think about all the cool things I could buy with $300 a month.
- Join the Phil Wood wheel-of-the-month club!
- Order two custom Rivendells and have the money saved by the time they’re ready.
- Buy a sweet LED bike light. Every month. For the rest of my life.
That would be if I had $300 a month that isn’t spent on housing, food, utilities or beer.
I never did find anything cooler than breathing, though.
-
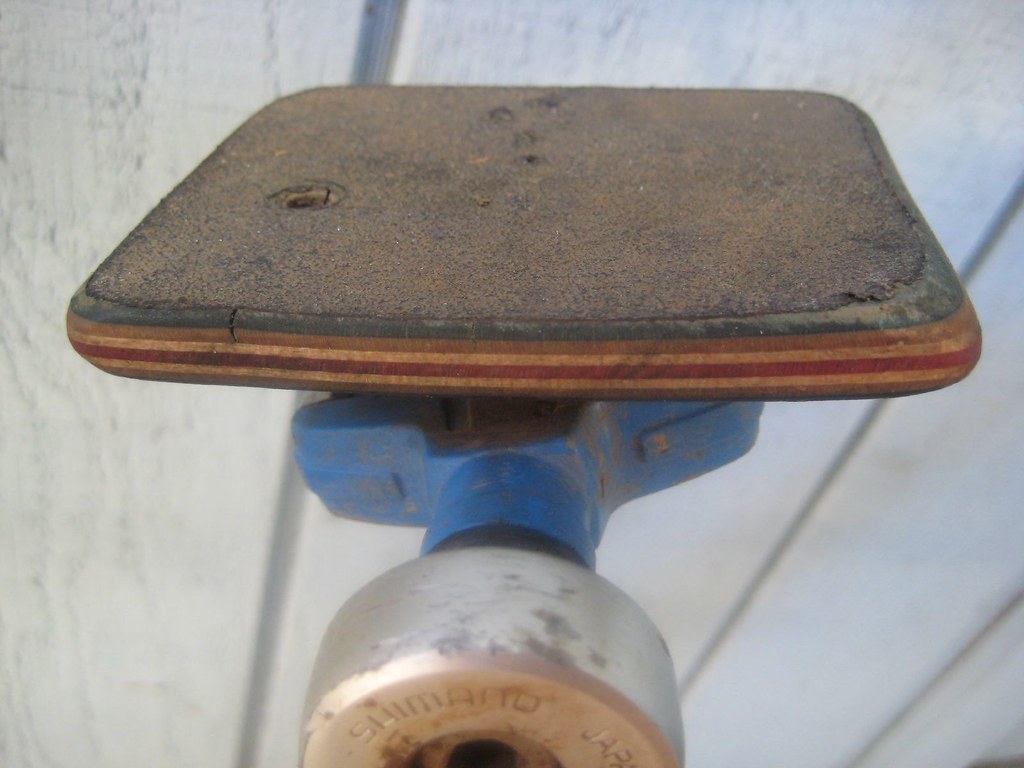
Skate deck pedal redux
**Update** These pedals are now available for sale from BikeTinker.comA while ago I posted about the skate-deck platforms I made to clip into clipless pedals. I screwed old Eggbeater cleats into cut-out chunks of skateboard deck, then clipped the platforms into the pedals, so I could ride in regular shoes.
After more than two years of almost daily use on a couple different bikes, I finally broke one. The pedal pulled off the cleat on a hard pedal strike, stripping the screws right out of the wood.I filled in the holes on both platforms with wood and glue, figuring to redrill a small hole and thread the screws in, but I chickened out, when I realized that the plug (a random dry stick, broken to fit) was a lot softer than the laminated skate deck.
Instead, I cut the pedals down to a smaller size, and drilled new holes.The new size is about the same as a caged mountain bike pedal, but with a lot more contact area. The old ones were 3.5″x4.5″, and the new ones are 3.5″x3″.The part I cut off was the curve I’d had in the originals. It was fine with all my shoes, except the Keens I got this year, so I wanted to try some skatepedals that were (mostly) flat.In the course of the refurbishment, I sanded the old graphics off the decks and put on some varnish, so they look a little nicer. New grip tape would really round out the package. I’m still really enamored of grip tape for pedals. -
Sheldon Brown
When I read that Sheldon Brown died this morning of a ‘massive heart attack,’ I had to take a break and go ride my bike for a bit. I only knew him on the internet, but he was “bicycling on the internet.” I feel for his family, and the people whose lives he was a part of in a more tangible way. That just sucks.
For us internet bike geeks, he really was a great personality, helpful and kind. He was directly responsible for me putting together my first fixed gear bicycle, and (I believe) a direct inspiration for the design of Quickbeam. How many bicycles and bicyclists did he inspire? 10,000?
What a loss.I was bummed out all day, and tonight after dinner I semi-idly clicked into the new Facebook account I set up to reconnect with some old friends, and WHUF there was Sheldon’s smiling face. He’d befriendstered me over the weekend. It made me really sad, but it also kind of encapsulated his spirit – befriending people right up to the end.
-
Midge Bars
With a little help from various internet friends (thanks!) I drop-barified the Bontrager. Midge bars, Dia-Compe 287v brake levers for the V-brakes, bar-end shifters. The friction shifters seem to work fine with the 9-speed drivetrain, but I’ve yet to use them while tired and climbing on dirt. The stem extender is the key, here. According to Miles’ BikeCAD drawing, it would take a 180mm stem with a 52 degree rise to get the bars to the same spot.I thought the bars were short in the ends, but the length is perfect with the bar-end shifters installed. Like they were designed for that. I did have to wrap the Planet Bike cork tape ‘foreskin’ fashion to cover up the scratchy bolts in the shifter pods, but it’s working okay so far.
Ahh… I think that’s the best look for the front of a bike. They seem to flare a little less at the ends than WTB drops, and the tops are wider. I think I can hang my Carradice “Junior” bag up there, which is too wide for the WTB bars.I’m a dork. Portly, too.How not to photograph a bike. Junky backyard crap and a dog’s tail! Zero contrast in the part of the shot you want to show off… can a bike photo get any worse? -
Oh my gwad.
Canadian dollars are worth more than real dollars.
We’re completely screwed.
I see Matt Chester is planning on building bike frames again, which makes me pleased and happy. I’ve rooted for him ever since I saw his bike on fixedgeargallery and said “you bastard!” because he nailed my mtb-meets-roadbike aesthetic down to the ground.
What’s the German for ‘opposite-of-Schadenfreude’?
He had some hard times for a while, and stopped taking orders for frames, but now he’s getting married, moving to Canada and he’ll take new frame orders in March.
$2200 Canadian for a custom titanium frame. “That’s a bargain, eh? What is that, like $1800?”No, y’hoser, it’s more like $2353.57!
Well! The opposite of Schadenfreude is mudita, taking delight in another’s well-being. That’s cool.
-
DIY bike-lane parking tickets
BikesnobNYC had a recent post about his commute through Brooklyn, with many photos of people parked in the bike lane (which he was trying, y’know, to use).
This ‘official’ fella didn’t come out on film, but through the Magic of Computer Enhancement appears to be a big ape.Commentors suggested getting the police to ticket bike lane parkers. Or stickering their cars.
Or… two great tastes that taste great together… put your own ticket on those cars and see how many people mail $115 checks to BSNYC. Of course, I’m so far behind the curve it’s sick-making. Ah well… never stopped me before!
Get the parking ticket PDF file, change the address and go to town!
Don’t forget the envelope!


